
검색결과 리스트
3D Printer/Anet A8에 해당되는 글 2건
- 2020.12.14 [Anet A8] 02. Upgrade
- 2020.12.03 [Anet A8] 01. 첫 3D 프린터 - 조립 1
글
[Anet A8] 02. Upgrade
Anet A8 조립을 마치고 그 상태에서 프린터를 계속 사용하는 유저는 몇 없을 것이다.
출력물을 뽑다 보면... 좀 더 좋은 품질의 출력물을 얻고 싶고, 좀 더 편하게/안전하게 프린트를 즐기고 싶고,
다른 사람들의 프린터와는 차별화를 가지고 싶어하는 자신을 발견하게 된다.
나 또한 Anet A8 3D 프린터를 Upgrade 했고,
실제로 Upgrade 전 보다 더 좋은 품질의 출력물을 출력할 수 있었다.
3D 프린터 Parts는 www.thingiverse.com 에서 검색했고
기타 부속은 www.aliexpress.com / www.sondori.com 등에서 구매했다.
여기저기 자료를 찾아보고 적용한 나의 Upgrade 리스트은 아래와 같다.
1. Bed Leveling Springs. (20mm)

기본 구성품에 포함된 스프링보다 텐션도 만족스러우며,
Bed에 닿는 단면적도 넓어 진동으로 부터 이점을 가질 수 있다.
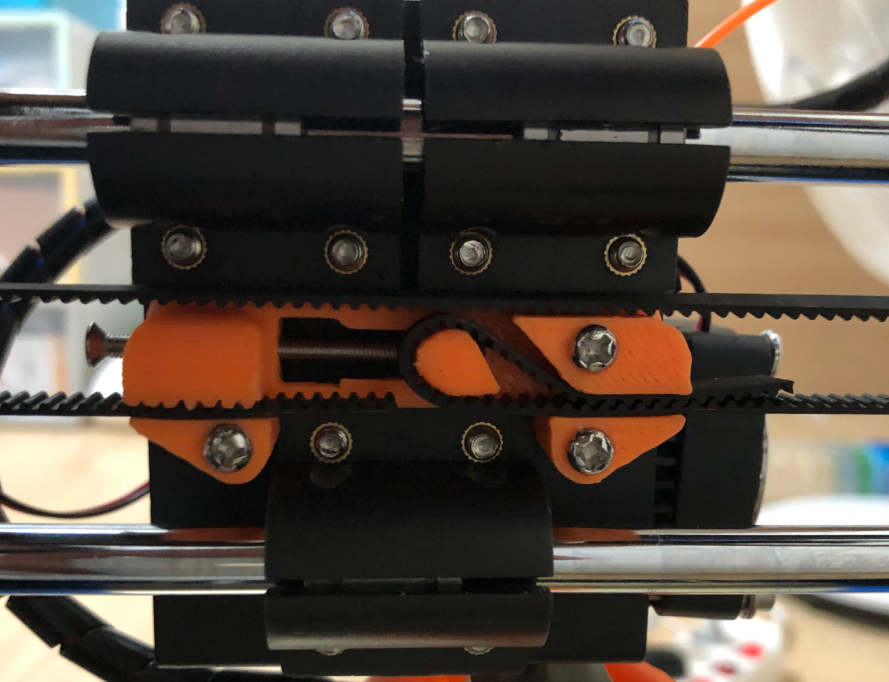
2. Y-Belt tensioner - www.thingiverse.com/thing:1959208
Anet A6/A8 upgrade: Y-Belt tensioner by Photograaf16
UPDATE 31-12-2016: Some people had problems with the Frame_L and Frame_R so I have update these files. they are a little bit stronger now. If you have problems with the size, you can contact me and i will make a smaller version for it :D I have made this u
www.thingiverse.com

Y축 벨트의 장력을 조절할 수 있어, 출력 품질을 높일 수 있다.
3. Extruder Button - www.thingiverse.com/thing:2182276
Anet A8 Extruder Button by TabLeft
Just a large comfortable knob to place over the filament release bolt on the extruder.
www.thingiverse.com

필라멘트 삽입/제거 시, 엄지손가락의 통증을 줄여준다... 꼭 하길 권장한다.
4. Y-Belt holder - www.thingiverse.com/thing:2347849
Anet A6/A8 Y Belt Holder Upgrade by Area51
Assembling the Anet A6 3D printer kit, I found that the Y Belt mounting was way to high for consistent belt tension. The belts included with the kit are thicker than standard GT-2 belts and more inflexible - I decided to replace them with standard RepRap G
www.thingiverse.com
Y 축 벨트의 장력을 유지한다. 아크릴로 고정하는 순정 부품보다 안정적이다
5. Cooling Fan Cover - www.thingiverse.com/thing:2357501
Anet A8 - Cooling Fan Cover by Cyberlamb
If you print this thing and find it useful, please consider hitting that "Tip Designer" button and help support more designs. There is no Anet branding on their printers, so I created this for decoration.
www.thingiverse.com

출력물 장착 전/후 품질의 향상은 없다, 나는 보기좋으라고 장착했다. 실제 장착해보니 보기 좋다
6. Cooling Fan Duct - www.thingiverse.com/thing:1954001
Semi-Circular Anet A8 Fan Duct by lokster
If you use this fan duct & think it makes your prints look better, don't forget to TIP! ;) This is my version of the "circular fan duct" for the Anet A8 printer (and other compatible printers). Highlights: it's actually semi-circular. The circular one defo
www.thingiverse.com

순정 팬 덕트의 경우 한 방향에서 쿨링이 되지만, 상기 팬 덕트의 경우 여러방향에서 쿨링이 된다.
팬 덕트는 다양한 종류가 있으니, 자신에게 맞는 출력물을 찾아서 쓰길 바란다.
7. X-Belt holder and tensionner - www.thingiverse.com/thing:2425783
Anet A8 X Belt holder and tensionner by Miranina
If you love this design and it help you, consider tipping me as I spent a good amount of time on this design. Thanks in advance ! Anet A8 PLUS : Since the stock belt is held by the top belt to use my design you'll need to reverse the x motor direction. Eit
www.thingiverse.com
Y 축 벨트의 장력을 유지시켜주며, 장력의 조절이 가능하다. 한가지 출력물로 홀더 / 텐션 모두 잡았다.
8. Z axis alignment indicator - www.thingiverse.com/thing:2684692
Anet A8 Z stepper alignment indicator by dugacki
Problem: On Anet A8 the left and right z steppers get misaligned (skip a step). This can happen because the screws aren't running smoothly or if the printer isn't assembled/aligned perfectly. I've had problems on almost every print with this when I first g
www.thingiverse.com

Z 축 양측 모터의 스텝 이동을 확인할 수 있는 출력물이다. 초기 셋팅 시 리드스크류의 출력물과 고정 출력물의 표시를 일직선으로 맞춘 후, 프린팅을 할 때 양측이 동일하게 스텝이 바뀌는지 확인할 수 있게 해준다.
양측 리드 스크류에 결합된 출력물이 지시하는 방향이 다르다면 Z축의 스텝이 차이가 있다는것을 의미하며, 이는 높이가 기울어졌음을 의미하게 된다.
9. Z axis endstop - www.thingiverse.com/thing:2050229
ANET A8 Z Endstop fine adjustment by ibschreiber
First of all, the original design is ingenious! Thank you Meermeneer! I did change two things: The Leg has a 2.95 mm hole for 3mm screws which gives more stability, no more drilling or heating needed anymore. The Foot is completely redesigned also for 3mm
www.thingiverse.com

수동 레벨링을 좀 더 쉽게 할 수 있게 해 준다. 레벨링을 해보면 이 출력물이 왜 필요한지 알게 된다.
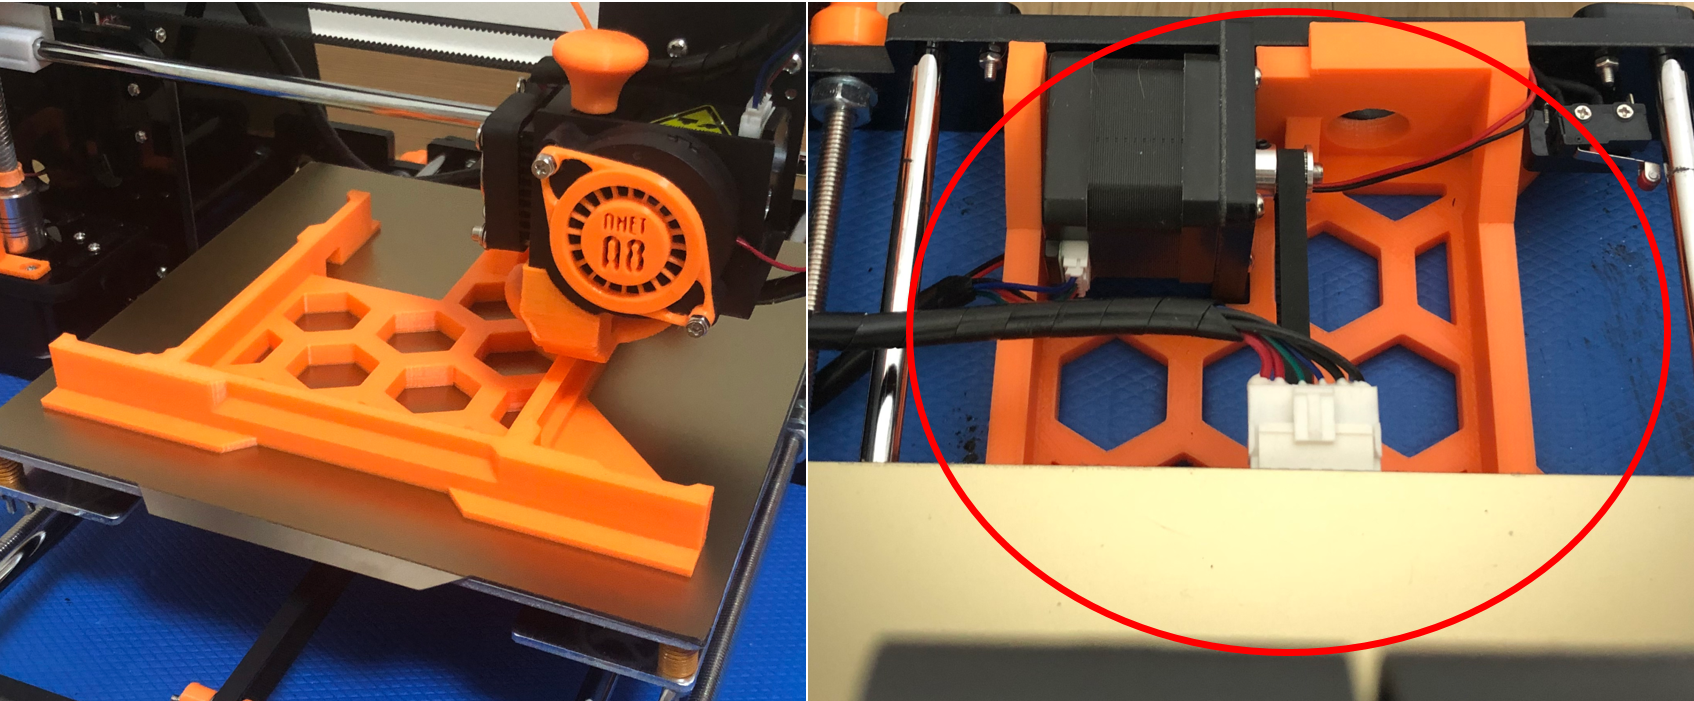
10. Electronics Box - www.thingiverse.com/thing:2736372
Anet A8 Electronics Box by feenix82
An open electronics box for the Anet A8 printer. This will bolt to the same guide holes as the mainboard. It will house the mainboard and dual mosfets. It is offset as to not interfere with the X-axis motor. There is a small cage either side of the mainboa
www.thingiverse.com

깔끔한 배선 정리가 필요하다면 출력하는 것이 좋다. Box의 커버도 있으니, 함께 출력하면 된다.
11. Front frame brace - www.thingiverse.com/thing:1857991
Anet A8 Front Frame Brace by Leo_N
This frame brace is intended for mounting at the front of an Anet A8 3D printer. I made it because it compliments the design of my rear brace (http://www.thingiverse.com/thing:1852358). Note for models sometime prior to mid 2017: The front acrylic frame is
www.thingiverse.com

A8 anet의 아크릴 프레임을 보강해주는 출력물이다.
12. Rear frame brace - www.thingiverse.com/thing:1430727
Frame brace for Anet A8 by Simhopp
frame brace for Anet 3D "Anet A8" model Prusa i3 3D printer aka "Omni" aka "m-505". Acrylic framed printers with 5 button next to LCD screen.http://www.aliexpress.com/store/1081732 install under the y axis motor to reinforce acrylic frame from bending due
www.thingiverse.com
A8 anet의 아크릴 프레임을 보강해주는 출력물이다.
13. T corner - www.thingiverse.com/thing:1672959
Anet A8 T corner by Electrico
corner to reduce z-wobble for Anet A8
www.thingiverse.com

A8 anet의 아크릴 프레임을 보강해주는 출력물이다.
14. M8 nut Cap - www.thingiverse.com/thing:2065870
Tapa tuercas frontales M8 (Anet A8) by kanjungla
Tapa protector para extremo delantero de las tuercas y tornillo M8.
www.thingiverse.com

튀어나온 M8 너트와 스크류의 커버다. 앞뒤/좌우 총 4개를 출력하면 된다.
15. Heated Bed MOSFET - https://a.aliexpress.com/_mOAY7Jr
US $7.67 20% Off | 2 Pcs Heated Bed Power Module Based on Powerful MOSFET HA210NO6 for Anet A8 A6 A2 Ramps 1.4
US $7.67 20% Off | 2 Pcs Heated Bed Power Module Based on Powerful MOSFET HA210NO6 for Anet A8 A6 A2 Ramps 1.4
star.aliexpress.com

메인보드의 부하를 줄여, 안정적으로 Bed의 히팅을 하기위한 모듈이다.
Hotend, Heated Bed 모두 적용하는 사람도 있지만, Hotend는 굳이 할 필요성을 느끼지 못해 하지않았다.
상기 제품링크는 모듈 2개를 묶음으로 판매하는 사이트의 링크이다. 하나만 구매하고 싶다면 검색해서 구매하면 된다.
16. Z axis parallel leveling supporter - www.thingiverse.com/thing:2962434
Anet A8 z-axis parallel levling support clip by caesar_1111
This bracket is designed for easy z-level adjustment of the Anet A8 (or any other printer with 8mm guiding rails) 70mm length should be the right height to place it under the y-z level joints right after doing the auto home. then you can manually lower the
www.thingiverse.com

Z 축의 평행을 세팅할 수 있도록 보조하는 출력물이다.
17. Micro SD Card Extension case - www.thingiverse.com/thing:2389960
Anet A8 - MicroSD Card Extension Case by Cyberlamb
If you print this thing and find it useful, please consider hitting that "Tip Designer" button and help support more designs. This is a modification of another thing (see link on left) as a simple holder for the Micro SD Card Extender. I liked the basic sh
www.thingiverse.com
https://a.aliexpress.com/_mKzMeOt
US $3.28 16% Off | Extension Cable Adapter Flexible Extender For Micro-SD To TF Card For Monoprice Select Mini 3D Printer/Ane
US $3.28 16% Off | Extension Cable Adapter Flexible Extender For Micro-SD To TF Card For Monoprice Select Mini 3D Printer/Anet A8 3D Printer/Rasp
star.aliexpress.com

있으면 편하다..
18. X axis Limit Switch End Stop - www.thingiverse.com/thing:2070153
Anet A8 X-Axis Limit Switch/End Stop Clip by thankHUWverymuch
The recent Anet A8 models have been shipped with injection moulded Z-axis nut supports and the screws supplied to secure the X-axis limit switch to it are the wrong size to fix it securely. So i designed this clip to do the job. This is only a minor upgrad
www.thingiverse.com

X축 End Stop을 좀 더 튼튼하게 고정할 수 있는 출력물이다.
19. Timing Belt 2GT-6mm - https://a.aliexpress.com/_mKBrUdX
US $2.99 | POWGE 2MGT 2M 2GT Open Synchronous Timing belt width 3/6/9/15mm Rubber Samll Backlash GT2 2GT-3/2GT-6/2GT-9/2GT-15mm
US $2.99 | POWGE 2MGT 2M 2GT Open Synchronous Timing belt width 3/6/9/15mm Rubber Samll Backlash GT2 2GT-3/2GT-6/2GT-9/2GT-15mm 3D printer
star.aliexpress.com

순정보다 왠지 더 쫀쫀한 것 같다..
20. LCD Bezel Trim - www.thingiverse.com/thing:3099419
Parametric LCD Bezel Trim Customizable by ggroloff
This is a customizable LCD bezel trim. It makes a friction fit bezel that fits between the gap of a housing and a lcd display. You can set the thickness and border of the bezel, the depth and thickness of the mounts, offset of the display area and mount, a
www.thingiverse.com

보기 좋으라고 했다..
21. 충격 흡수 매트 (50x40x6) - smartstore.naver.com/chosimstore/products/4623625982?NaPm=ct%3Dkinfmp6x%7Cci%3Dcheckout%7Ctr%3Dppc%7Ctrx%3D%7Chk%3D9af21133a70773a1b4c990e33f5c22c83ad0dc7e
밸런스패드 데드리프트 매트 소음 방지 블럭 충격흡수 블록 발란스 차단 거치대 고경도매트 : MYO
[MYOLOGIST] 근성장을 일으키지 않는 제품들은 취급하지 않습니다. MYOLOGIST<근학자>
smartstore.naver.com

진동 및 층간 소음을 방지 할 수 있다. 사이즈가 딱 A8 Anet 사이즈다.
22. PEI 자석 베드 - smartstore.naver.com/sondori/products/4735917102?NaPm=ct%3Dkinftviu%7Cci%3Dcheckout%7Ctr%3Dppc%7Ctrx%3D%7Chk%3D5d38a930fb1b03dfdabb456011dd91ff6b974d9c
손도리 PEI 금속 자석 베드 : 손도리닷컴
[손도리닷컴] DIY의 모든것 손도리닷컴
smartstore.naver.com

써보니 좋다. 안착 너무 잘된다. 빨리 배송 받고 싶다면 손도리. 아니면 알리에서 주문하면 된다.
.
.
.
.
.
위의 Upgrade를 모두 하면... 이렇게 된다.

항상 코드를 꼽아둔 상태에서 멀티탭의 스위치로 ON/OFF를 하면되서, Power(PSU) 쪽은 별도로 Upgrade하지 않았다.
출력물의 퀄리티는 가격 대비 만족스럽다.
1)
2)

3)

4)

'3D Printer > Anet A8' 카테고리의 다른 글
| [Anet A8] 01. 첫 3D 프린터 - 조립 (1) | 2020.12.03 |
|---|
설정
트랙백
글
[Anet A8] 01. 첫 3D 프린터 - 조립

우연한 기회에 3D 프린터를 접하게 되어 2019년도 상반기에 나의 첫 3D 프린터 'Anet A8'을 구매했다.
하지만 바쁘다는 핑계로 조립을 하루이틀 미루다 보니, 정작 구매한지 1년이 넘어서야 조립을 했다.
그래도 첫번째 3D 프린터인데 기록은 남겨야 할꺼 같아 이제서야 글을 쓴다.
싸고, 가성비 좋은 모델이면서 많은 사람들이 사용 혹은 사용했었던 모델.
완제품보다는 조립을 하면서 3D 프린터에 대해 배울수 있을만한 모델을 찾다보니 'Anet A8'을 선택하게 됐다.
제품 구성은 3단으로 분리되어 있다.


제품의 포장은 그럭저럭 깔끔하게 되어있는 편이다. 조립하다가 먹으라고 미니약과도 들어있었으나,
구매하고 1년 넘게 방치되었던 탓에 약과는 눈으로만 보는걸로...하고 버렸다.

Anet A8의 경우 단자쪽 쇼트, 화재 등으로 잡음이 있는 모델이다. 그래서 순정 제품에서 안전을 위해 몇가지 부분에 대해서 보완을 해줘야 하는 부분도 있다. 다행히도 내가 구매한 제품의 메인보드는 개선 버전이였다. 제품 포장비닐에는 'Upgraded Version'이라고 적혀있다.
개선 전의 메인보드는 아래 사진과 같다.
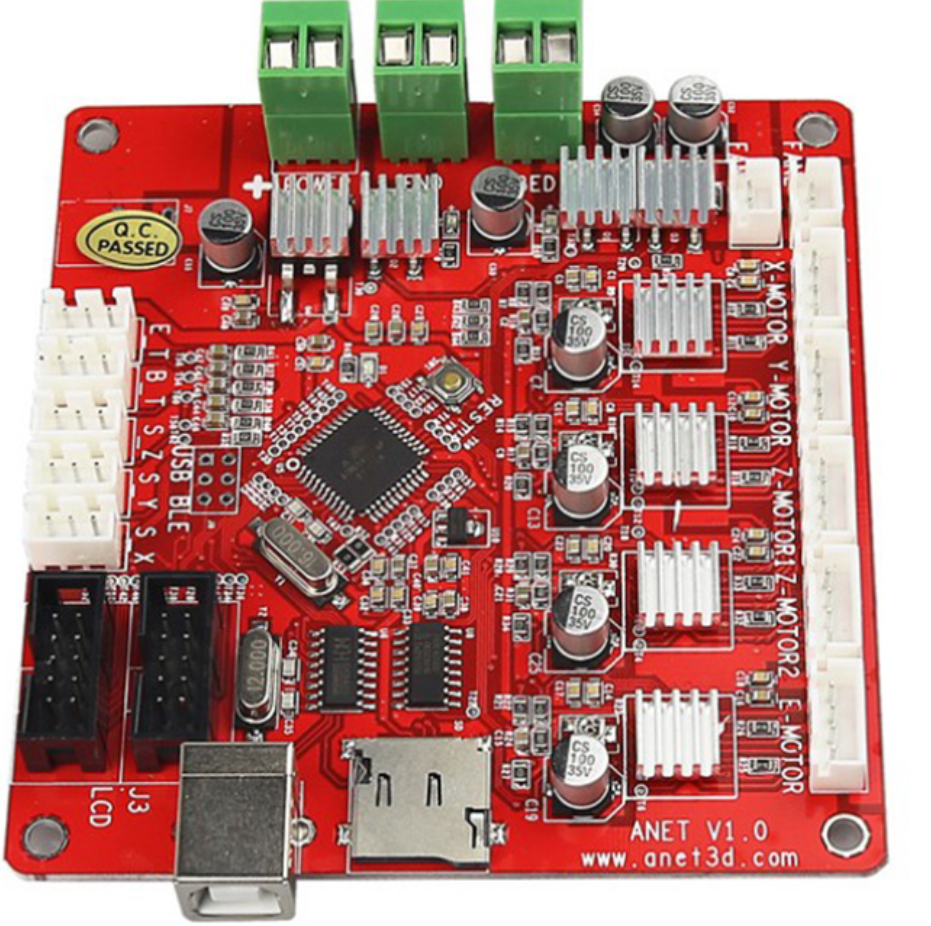
보여지는 것만 비교하더라도 단자대 반영, 퓨즈 추가 등 확실히 개선된 메인보드가 더 안전할 것 같다.
퇴근 후 시간 날때마다 조금씩 조립을 해서 Anet A8 제품을 조립하는데 정확히 얼마나 시간이 걸렸는지 알 수는 없으나, 어림잡아 일주일 정도 걸렸던것 같다.
조립 난이도는 그리 높지는 않다. 유튜브로 제품 조립 영상을 켜놓고 아크릴 프레임의 앞/뒤,좌/우 잘 구분하면서 천천히 따라만 하면 어렵지 않게 조립할 수 있다. 물론 사람마다 차이는 존재하기 마련이다..
화재에 대한 잡음이 있는데도 우수한 가성비로 인하여 전세계적으로 많은 사람이 사용한 제품이여서 인터넷에 검색만 하면 관련 자료를 쉽게 확인 할 수 있다.
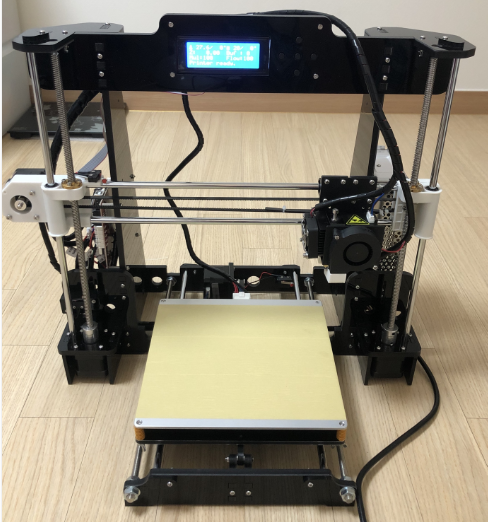
유튜브 조립 영상을 켜놓고 따라 하기만 하면.. 어느새..

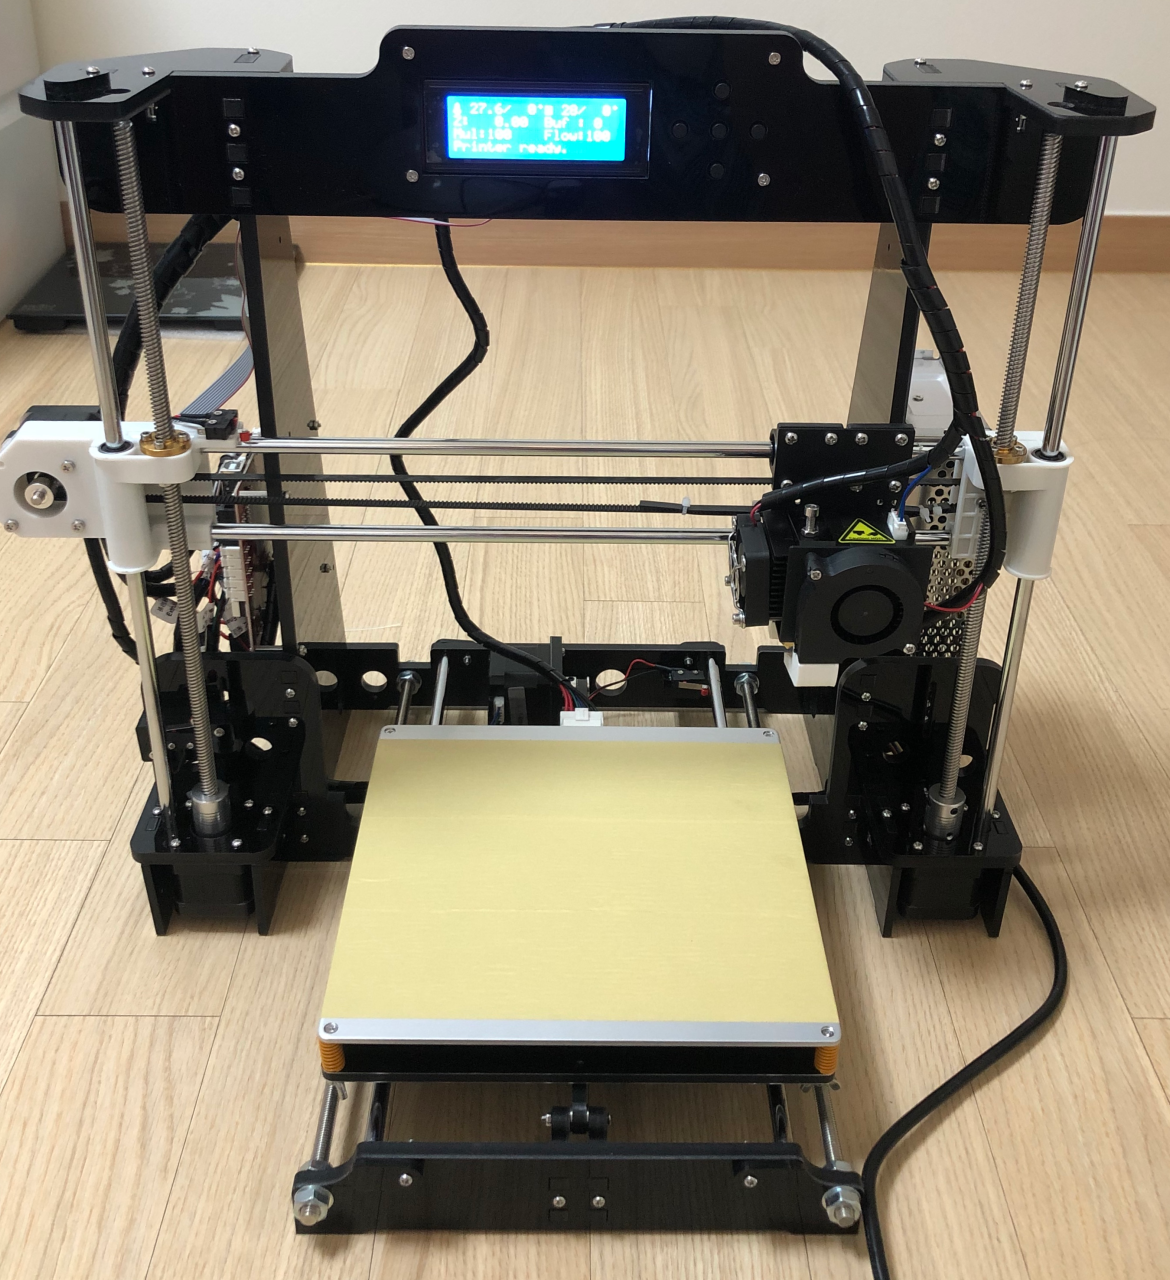
이렇게 조립이 완료된다.
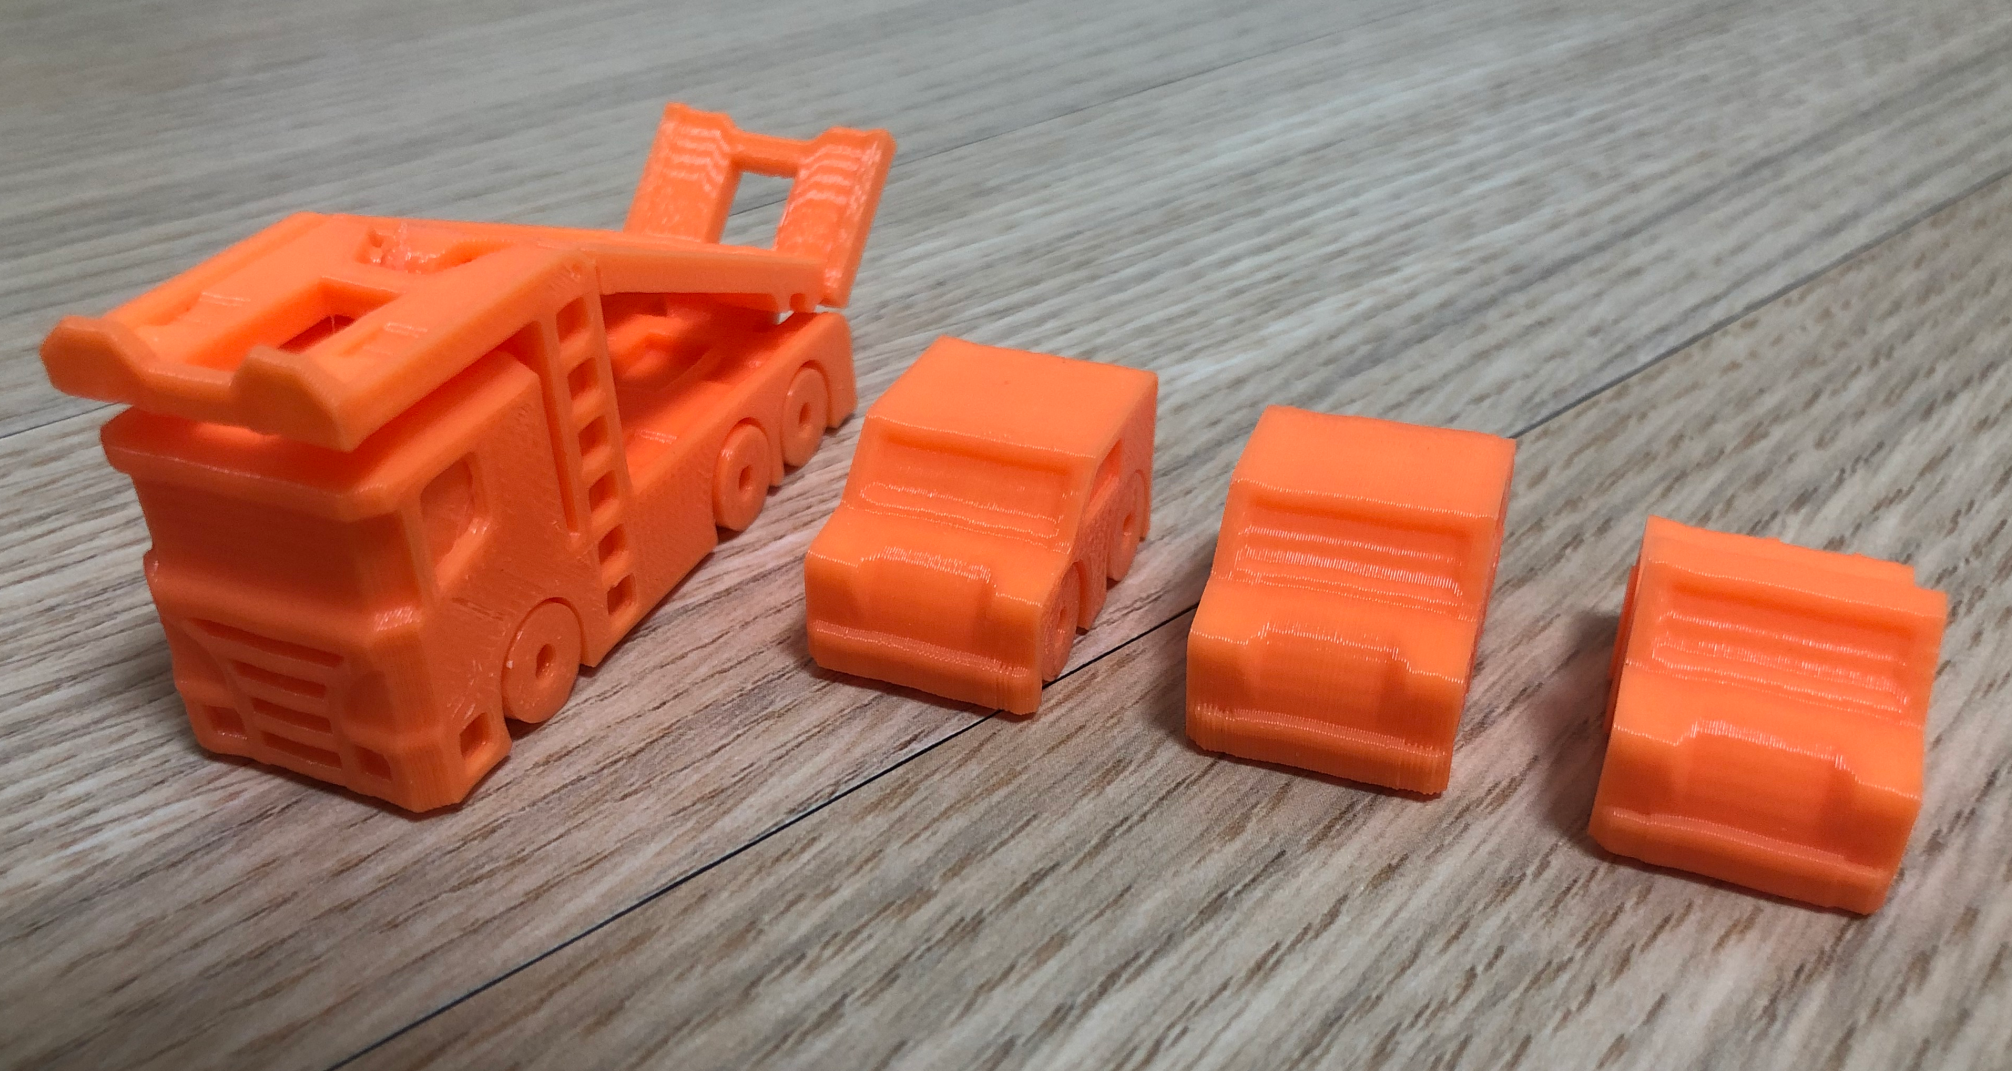
조립 후 선 정리를 끝내고 동봉된 필라멘트로 SD카드에 들어있는 샘플을 출력해 봤다.
3D 프린터에 대해 아무것도 모르는 상태에서 기술도, 노하우도 없이 출력했는데도 출력물이 그럴듯 하게 나왔다.
역시 전세계적으로 많이 팔릴만 하다.
'3D Printer > Anet A8' 카테고리의 다른 글
| [Anet A8] 02. Upgrade (0) | 2020.12.14 |
|---|